Hive安装与启动

修改hadoop相关参数

  1. 修改core-site.xml

1
2
3
4
5
6
7
8
9
10
11
12
13
14
15
16
[atguigu@hadoop hive]$ vim /opt/module/hadoop/etc/hadoop/core-site.xml 
<!-- 配置该atguigu(superUser)允许通过代理访问的主机节点 -->
<property>
<name>hadoop.proxyuser.atguigu.hosts</name>
<value>*</value>
</property>
<!-- 配置该atguigu(superUser)允许通过代理用户所属组 -->
<property>
<name>hadoop.proxyuser.atguigu.groups</name>
<value>*</value>
</property>
<!-- 配置该atguigu(superUser)允许通过代理的用户-->
<property>
<name>hadoop.proxyuser.atguigu.users</name>
<value>*</value>
</property>
  1. 配置yarn-site.xml

1
2
3
4
5
6
7
8
9
10
11
12
13
14
15
16
17
18
19
20
21
22
23
24
25
26
27
28
29
30
31
32
33
34
35
36
37
[atguigu@hadoop hive]$ vim /opt/module/hadoop/etc/hadoop/yarn-site.xml 
<!-- NodeManager使用内存数,默认8G,修改为4G内存 -->(16g物理内存的改为2g或者是3g)
<property>
<description>Amount of physical memory, in MB, that can be allocated
for containers. If set to -1 and
yarn.nodemanager.resource.detect-hardware-capabilities is true, it is
automatically calculated(in case of Windows and Linux).
In other cases, the default is 8192MB.
</description>
<name>yarn.nodemanager.resource.memory-mb</name>
<value>4096</value>
</property>
<!-- 容器最小内存,默认512M -->
<property>
<description>The minimum allocation for every container request at the RM in MBs.
Memory requests lower than this will be set to the value of this property.
Additionally, a node manager that is configured to have less memory than this value
</description>
<name>yarn.scheduler.minimum-allocation-mb</name>
<value>512</value>
</property>

<!-- 容器最大内存,默认8G,修改为4G -->
<property>
<description>The maximum allocation for every container request at the RM in MBs.
Memory requests higher than this will throw an InvalidResourceRequestException.
</description>
<name>yarn.scheduler.maximum-allocation-mb</name>
<value>4096</value>
</property>

<!-- 虚拟内存检查,默认打开,修改为关闭 -->(使用虚拟内存)
<property>
<description>Whether virtual memory limits will be enforced for containers.</description>
<name>yarn.nodemanager.vmem-check-enabled</name>
<value>false</value>
</property>

Hive 解压安装

你可以下载自己喜欢的或者适配的版本

  1. 把apache-hive-3.1.2-bin.tar.gz 上传到linux 的/opt/software 目录下

  2. 将/opt/software/目录下的apache-hive-3.1.2-bin.tar.gz 到/opt/module/目录下面

1
tar -zxvf apache-hive-3.1.2-bin.tar.gz -C /opt/module/ 
  1. 修改解压后的目录名称为hive

1
mv apache-hive-3.1.2-bin/ /opt/module/hive
  1. 修改/etc/profile.d/my_env.sh 文件,将hive 的/bin 目录添加到环境变量

[atguigu@hadoop hive]$ sudo vim /etc/profile.d/my_env.sh

1
2
3
4
……
#HIVE_HOME
export HIVE_HOME=/opt/module/hive
export PATH=$PATH:$HIVE_HOME/bin

[atguigu@hadoop hive]$ source /etc/profile

Hive 元数据的三种部署方式

元数据库之Derby

内嵌模式示意图 :

Derby 数据库

Derby 数据库是Java编写的内存数据库,在内嵌模式中与应用程序共享一个JVM,应用程序负责启动和停止。

初始化Derby数据库

  1. 在hive根目录下,使用/bin目录中的schematool命令初始化hive自带的Derby元数据库

1
[atguigu@hadoop hive]$ bin/schematool -dbType derby -initSchema
  1. 执行上述初始化元数据库时,会发现存在jar包冲突问题,现象如下:hadoop 和hive 下都有这个jar包,以底层的hadoop为主,改了hive的)

1
2
3
4
SLF4J: Found binding in [jar:file:/opt/module/hive/lib/log4j-slf4j-impl
2.10.0.jar!/org/slf4j/impl/StaticLoggerBinder.class]
SLF4J: Found binding in [jar:file:/opt/module/hadoop-3.1.3/share/hadoop/common/lib/slf4j
log4j12-1.7.25.jar!/org/slf4j/impl/StaticLoggerBinder.class]
  1. 解决jar冲突问题,只需要将hive的/lib目录下的log4j-slf4j-impl-2.10.0.jar重命名即可

1
[atguigu@hadoop hive]$ mv lib/log4j-slf4j-impl-2.10.0.jar lib/log4j-slf4j-impl-2.10.0.back

启动Hive

  1. 执行/bin目录下的hive命令,就可以启动hive,并通过cli方式连接到hive

1
[atguigu@hadoop hive]$ bin/hive  
  1. 使用Hive

1
2
3
4
5
6
7
8
9
10
11
12
13
14
15
16
17
18
19
20
21
22
23
24
25
26
27
hive> show databases;                                      // 查看当前所有的数据库 
OK
default
Time taken: 0.472 seconds, Fetched: 1 row(s)
hive> show tables; // 查看当前所有的表
OK
Time taken: 0.044 seconds
hive> create table test_derby(id int); // 创建表test_derby,表中只有一个字段,字段类型是
int
OK
Time taken: 0.474 seconds
hive> insert into test_derby values(1001); // 向test_derby表中插入数据
Query ID = atguigu_20211018153727_586935da-100d-4d7e-8a94-063d373cc5dd
Total jobs = 3
……
Hadoop job information for Stage-1: number of mappers: 1; number of reducers: 1
……
Stage-Stage-1: Map: 1 Reduce: 1 Cumulative CPU: 6.19 sec HDFS Read: 12769 HDFS Write: 208
SUCCESS
Total MapReduce CPU Time Spent: 6 seconds 190 msec
OK
Time taken: 31.901 second
hive> select * from test_derby; // 查看test_derby表中所有数据
OK
1001
Time taken: 0.085 seconds, Fetched: 1 row(s)
hive> exit;

内嵌模式只有一个JVM进程

在内嵌模式下,命令行执行jps –ml命令,只能看到一个CliDriver进程。

1
2
3
4
[atguigu@hadoop hive]$ jps –ml 
7170 sun.tools.jps.Jps -ml
6127 org.apache.hadoop.util.RunJar /opt/module/hive/lib/hive-cli-3.1.2.jar
org.apache.hadoop.hive.cli.CliDriver

Hive自带的元数据库的问题

演示采用Derby作为元数据库的问题:开启另一个会话窗口运行Hive,同时监控/tmp/atguigu目录中的hive.log文件,会观察到如下错误信息。

1
2
3
4
5
6
7
8
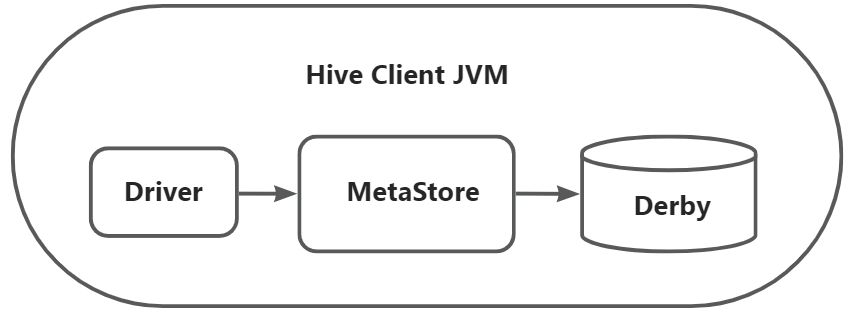
Caused by: ERROR XSDB6: Another instance of Derby may have already booted the database 
/opt/module/hive/metastore_db.
at org.apache.derby.iapi.error.StandardException.newException(Unknown Source)
at org.apache.derby.impl.store.raw.data.BaseDataFileFactory.privGetJBMSLockOnDB(Unknown
Source)
at org.apache.derby.impl.store.raw.data.BaseDataFileFactory.run(Unknown Source)
...

Hive默认使用的元数据库为derby并且部署方式是内嵌式,在开启Hive之后就会独占元数据库,且不与其他 客户端共享数据,如果想多窗口操作就会报错,操作比较局限。为此Hive支持采用MySQL作为元数据库,就可 以支持多窗口操作。

元数据库之Mysql``

元数据服务模式示意图

image.png

元数据服务模式

在服务器端启动MetaStore服务,客户端利用Thrift协议通过MetaStore服务访问元数据库。 元数据服务的访问方式更适合在生产环境中部署使用,相比内嵌式,该方式更加的灵活。(跨网络跨语言跨平台

将Mysql 做为元数据库,部署元数据服务

  1. 首先,将hive的元数据库配置为Mysql

[atguigu@hadoop hive]$ vim conf/hive-site.xml

  1. 在hive-site.xml 文件中添加如下配置信息

1
2
3
4
5
<!-- 指定存储元数据要连接的地址 --> 
<property>
<name>hive.metastore.uris</name>
<value>thrift://hadoop102:9083</value>
</property>

注意:在配置了此参数后,启动hive之前必须先启动元数据服务,否则,hive启动后无法连接到元数据服务

  1. 启动元数据服务

[atguigu@hadoop hive]$ bin/hive --service metastore
2024-06-25 18:22:24: Starting Hive Metastore Server
注意: 启动后窗口不能再操作,需打开一个新的shell窗口做别的操作

  • 启动 hive,查看表及表中数据,是否是Mysql数据库中的表。

  • 在另一个窗口启动hive,测试多客户端能否同时连接操作。

hive 的两种访问方式

命令行的方式

HiveServer2 模式

JDBC 访问Hive 示意图:

JDBC 方式访问Hive

JDBC 方式,本质上是将hive包装为服务发布出去,开发者使用JDBC的方式连接到服务,从而操作hive。 减少了对hive环境的依赖

开启Hiveserver2

  1. 在hive-site.xml 文件中添加如下配置信息

1
2
3
4
5
6
7
8
9
10
<!-- 指定hiveserver2 连接的host --> 
<property>
<name>hive.server2.thrift.bind.host</name>
<value>hadoop</value>
</property>
<!-- 指定hiveserver2 连接的端口号 -->
<property>
<name>hive.server2.thrift.port</name>
<value>10000</value>
</property>
  1. 重启MetaStore 服务

1
bin/hive --service metastore
  1. 启动hive服务(这里需要考虑元数据的访问方式,如何使用元数据服务的模式,需要提前开启元数据服务)

1
bin/hive --service hiveserver2
  1. 启动beeline客户端(需要多等待一会,否则会报错连不上)

1
2
bin/beeline -u jdbc:hive2://hadoop:10000 -n atguigu
//bin/beeline -u jdbc:hive2://主机用户名:10000 -n root(用户)
  1. 使用JDCB 访问时出现异常报错,如atguigu is not allowed to impersonate atguigu

解决方案:在core-site.xml 中添加如下:

1
2
3
4
5
6
7
8
<property> 
<name>hadoop.proxyuser.xxx.hosts</name>
<value>*</value>
</property>
<property>
<name>hadoop.proxyuser.xxx.groups</name>
<value>*</value>
</property>

“*”表示可通过超级代理“xxx”操作hadoop的用户、用户组和主机